Business Voice Features - Hunt Groups
his guide is designed for administrators managing Connect it services in the Anywhere Portal and need to manage call flow settings. ucSKILLS includes video tutorials covering the main call flow settings.
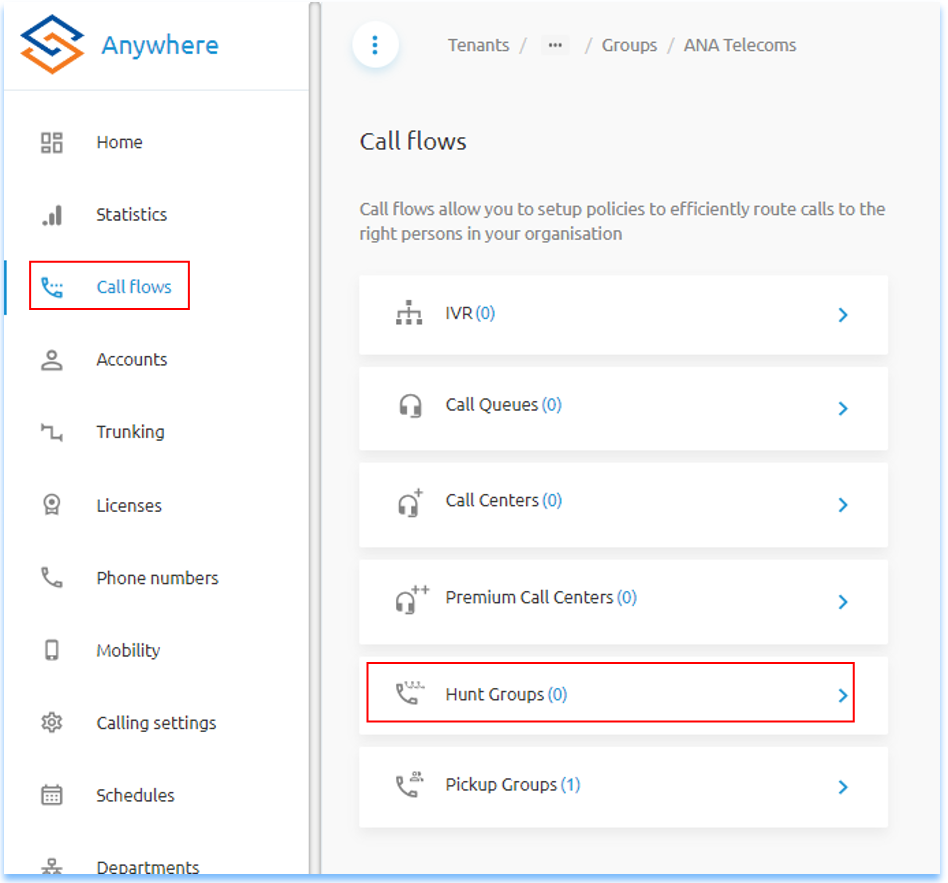
Add Hunt Group
To add a Hunt Group, click on Call Flows from the side menu, then Hunt Groups.
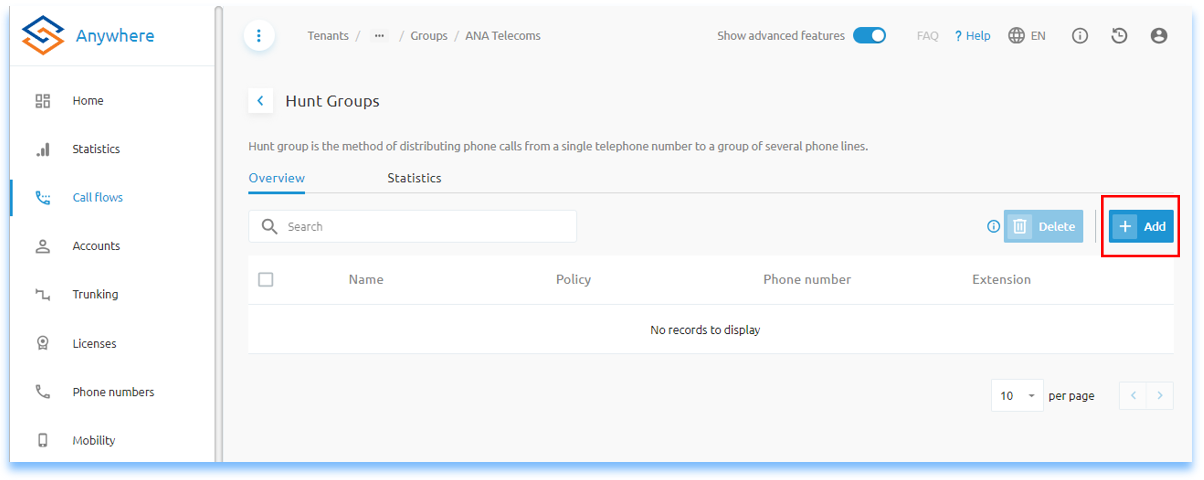
Click the Add button
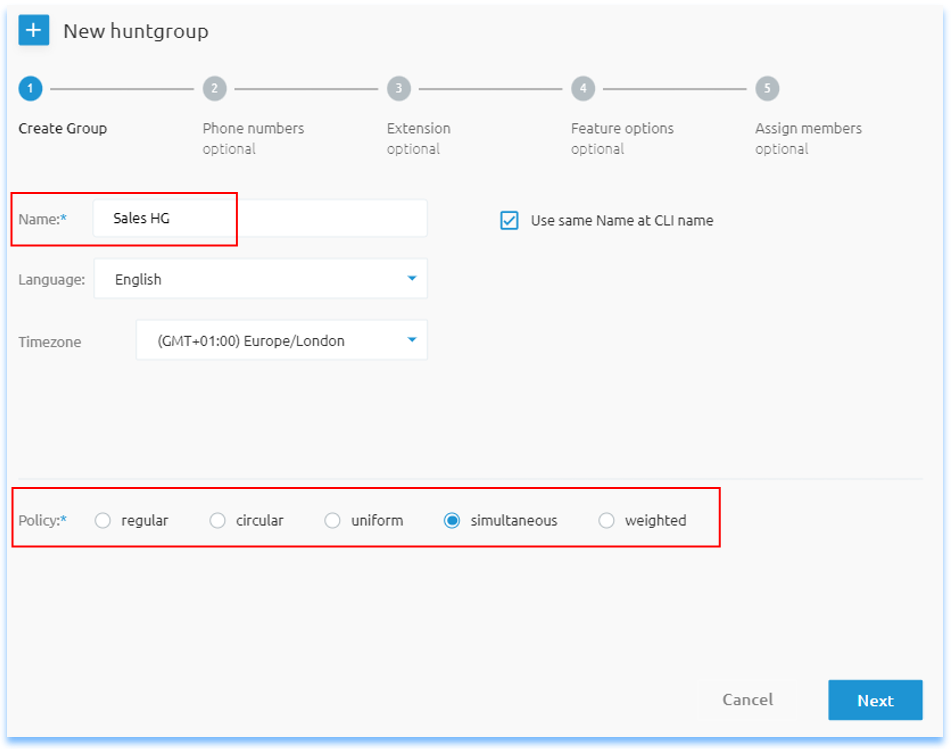
Create Group
Enter a Hunt Group name. Where other virtual services are in use such as Auto Attendants & Call Centers, it is recommended to identify the service within the Name, eg HG for Hunt Group. This helps where more complicated call flows are built.
The Timezone will pick up the Group default timezone set, however if the Hunt Group is in a different timezone to the group then setting this is required to enable correct time based call flow.
Set the Policy for call routing to users within the Hunt Group. See Huntgroup Policy Settings for more detail.
Click Next to continue.
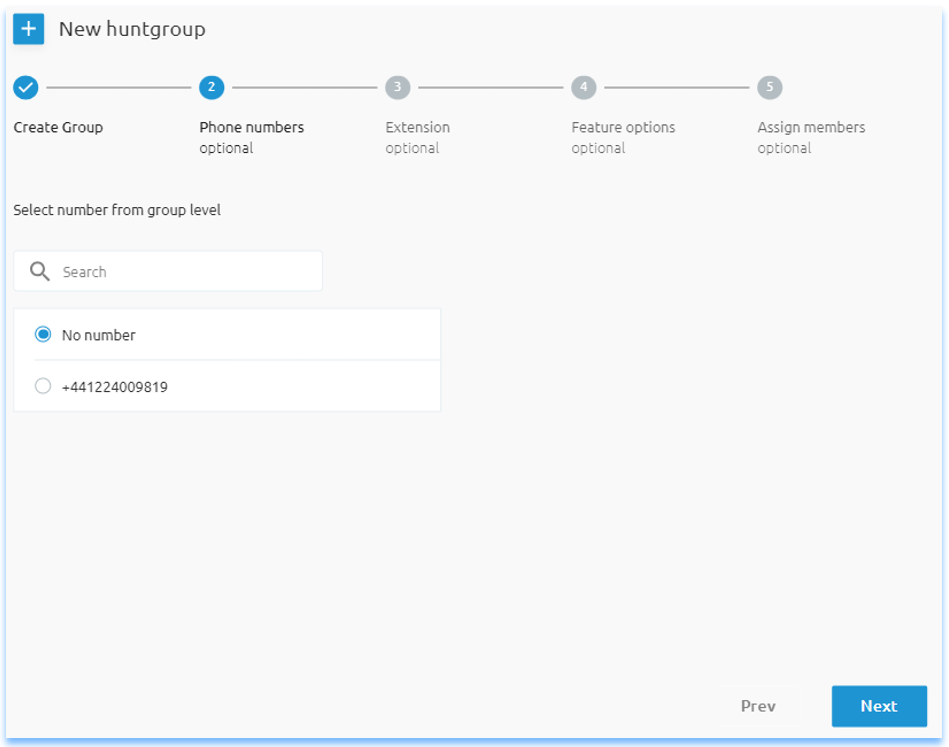
Phone Numbers
Select a phone number (DDI) if required for external inbound calling to the huntgroup. If no numbers are available you can order new numbers from the Connect it portal.
Click Next to continue.
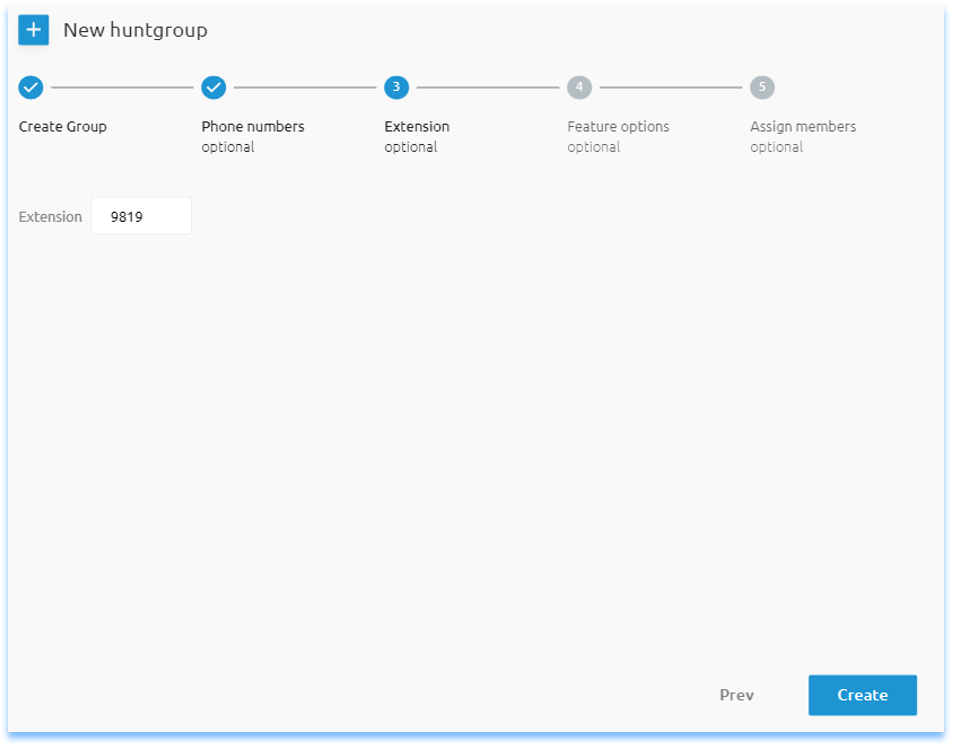
Extension
If having selected a DDI on the previous screen, the extension number will auto populate, you can change this to any number required for call flow.
Click the Create button to continue.
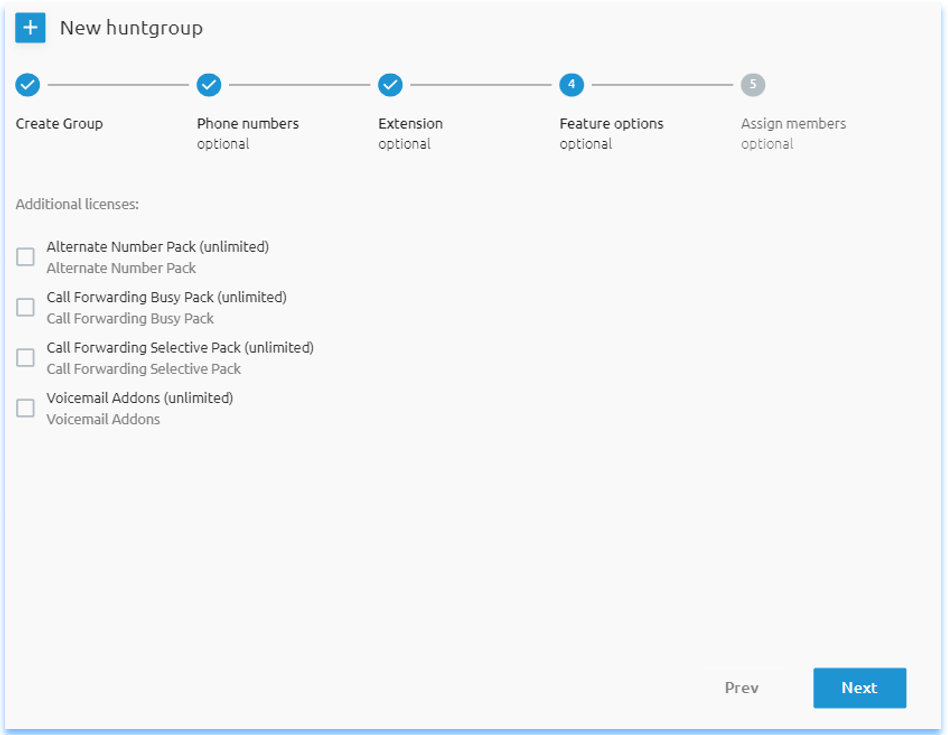
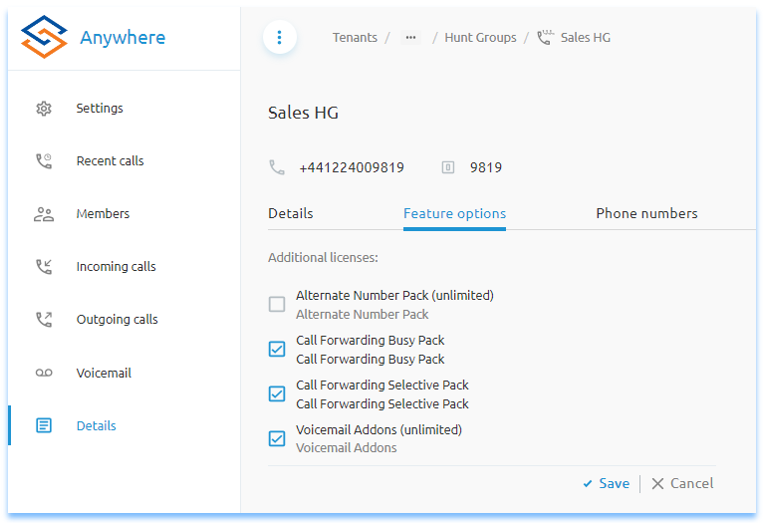
Feature Options
Additional licenses can be added to the huntgroup to achieve further call flow requirements. See Huntgroup Call Forward Settings.
Click Next to continue.
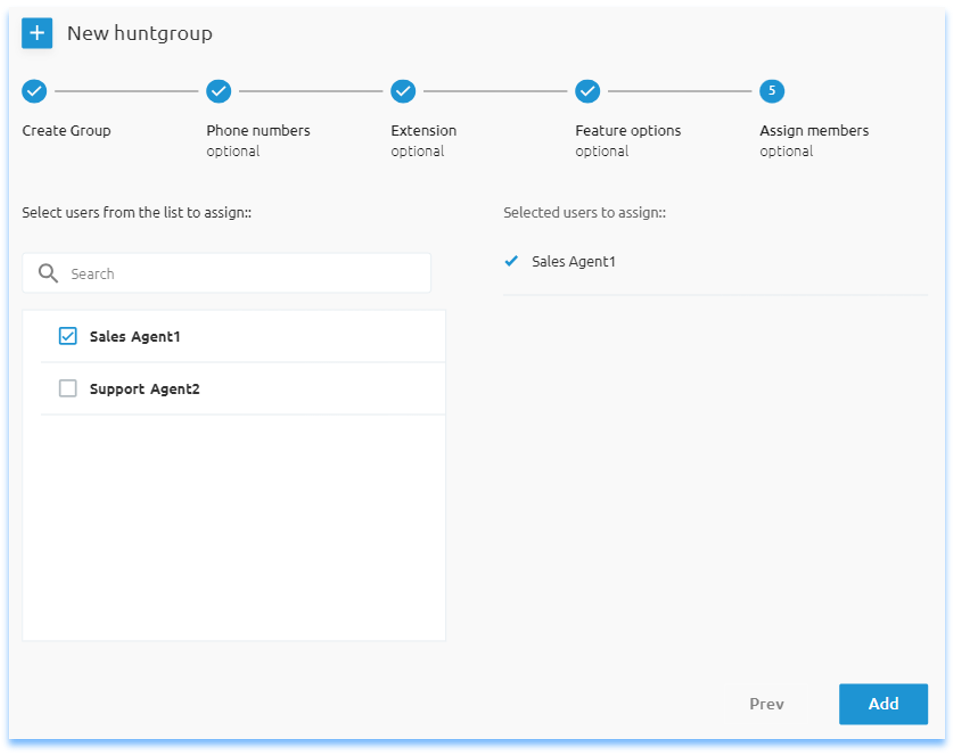
Assign Members
Select the users to be a member of the huntgroup.
Click Add button to complete the wizard.
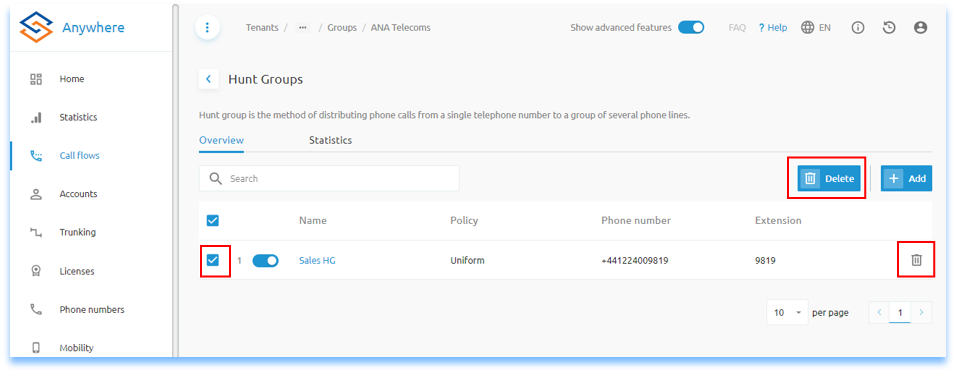
Delete Hunt Group
To delete a huntgroup, either select the check box next to the huntgroup and press the Delete button, of press the trash icon next to the huntgroup required to delete.
Once deleted, you can not undo this action.
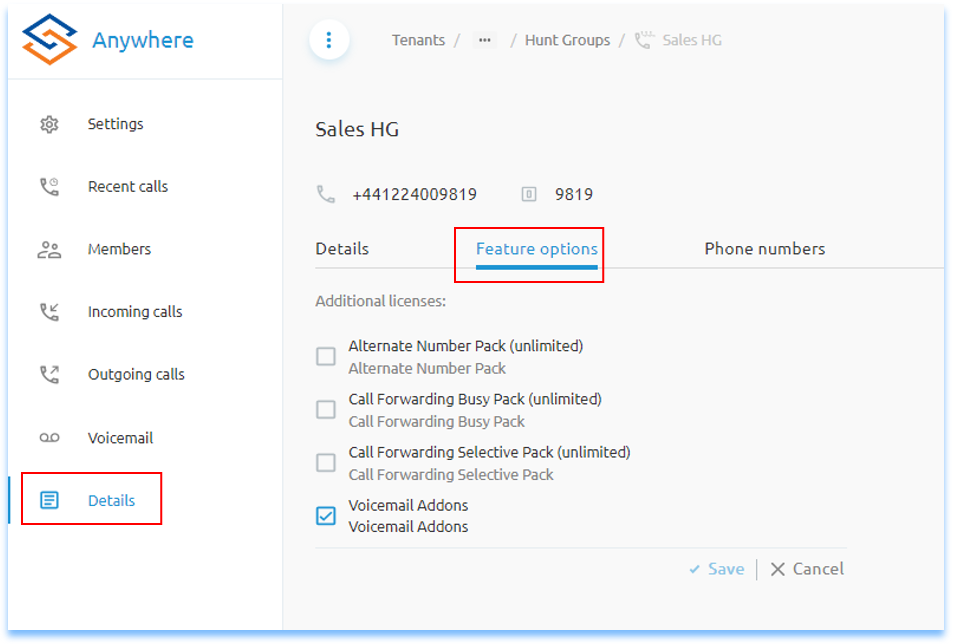
Voicemail Addons
If Voicemail was not selected when creating the huntgroup, Voicemail Addons can be selected in the huntgroup under Details, Feature Options.
Click Save to add Voicemail to the huntgroup.
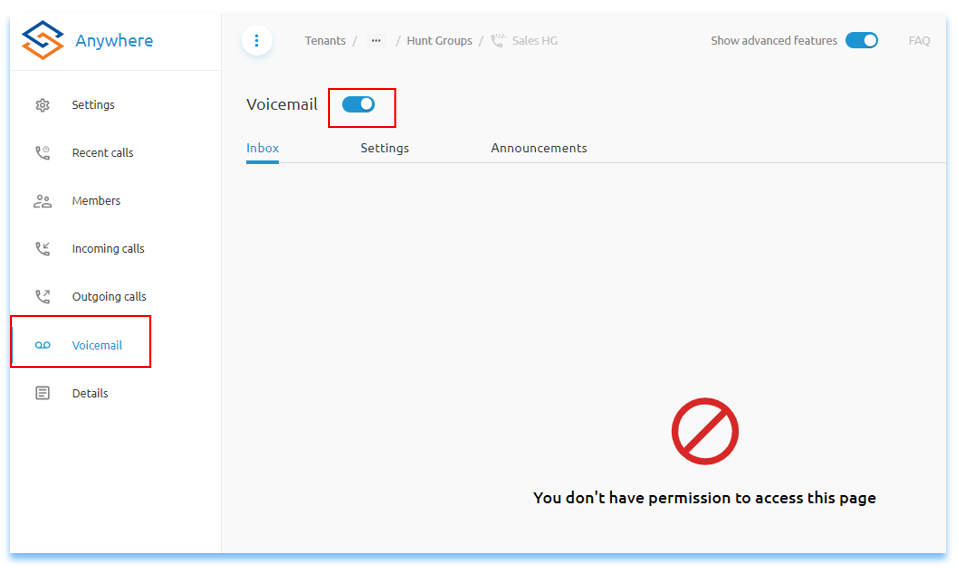
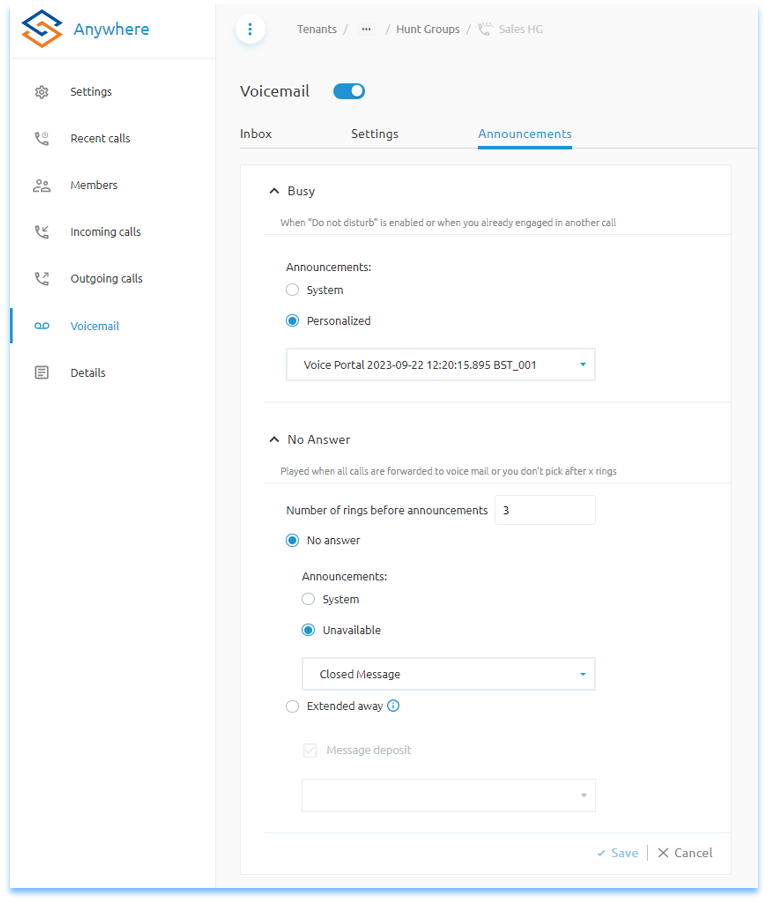
Voicemail
To access voicemail after the page has been refreshed, click Voicemail in the side menu.
Note: the Inbox by default will show you do not have permission to access this page, this is due to the logged in user not being the owner of the mailbox to see Visual Voicemail.
By default Voicemail is enabled, to disable it press the toggle button.
Note: disabling voicemail will delete any saved messages in the current mailbox.
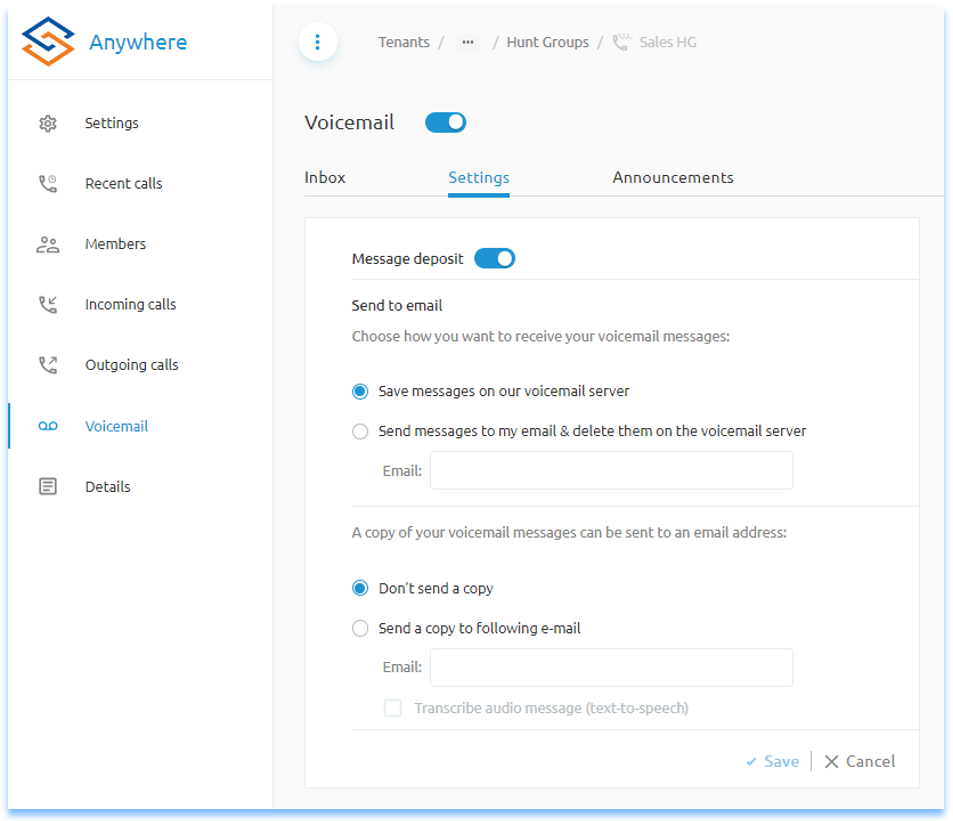
Settings
By default, voicemail is stored on the server. To access the voicemail, dial the Voice Portal extension number for the Group. When prompted, enter the extension number for the huntgroup and the voicemail pin number to listen to voicemail stored.
Voicemail can also be delivered to an email address. Only one email address can be specified, if required to deliver the voicemail to more than one person then a email distribution list should be used. Voicemial will not be stored on the server when this option is chosen.
Alternatively, if keeping the voicemail on the server, you can send a copy of the voicemail to an email address. Or if choosing to send the email initially to an email address, a second email address can be used on copy to send to.
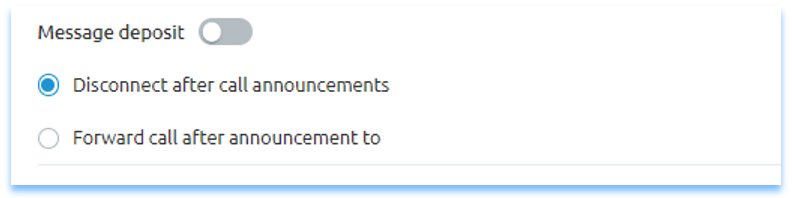
Message Deposit
To disable the Message Deposit, select the toggle button. This will stop messages being allowed to be recorded. Use this option when you just want to play an announcement to the caller. When toggled to the off position, two additional options are available to select. By default the call is disconnected, but its also possble to forward the call after the announcement is played to another extension/DDI.
Announcements
By default, the system audio will play for Busy and No Answer calls. To change the announcement select Personalized or Unavailable options to choose the announcement required. Announcements are saved in the group main side menu under Media.
For the No Answer announcement, the option for Number Of Rings Before Announcements can not be set against a huntgroup, this is a User only option.
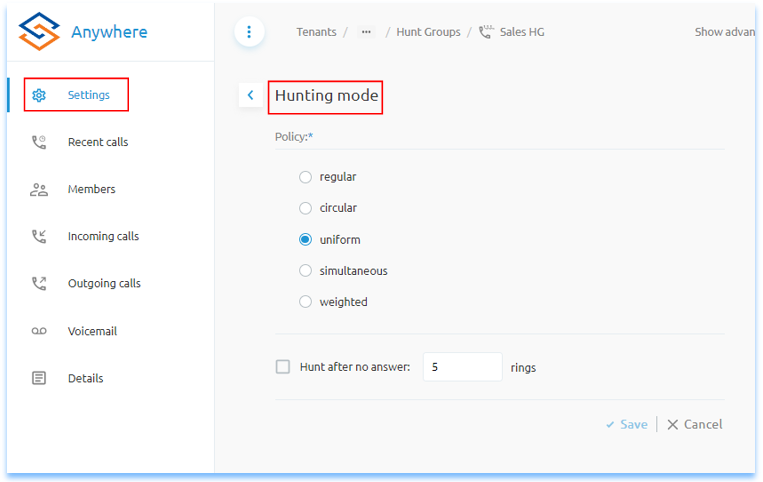
Hunt Group Policy - Hunting Mode
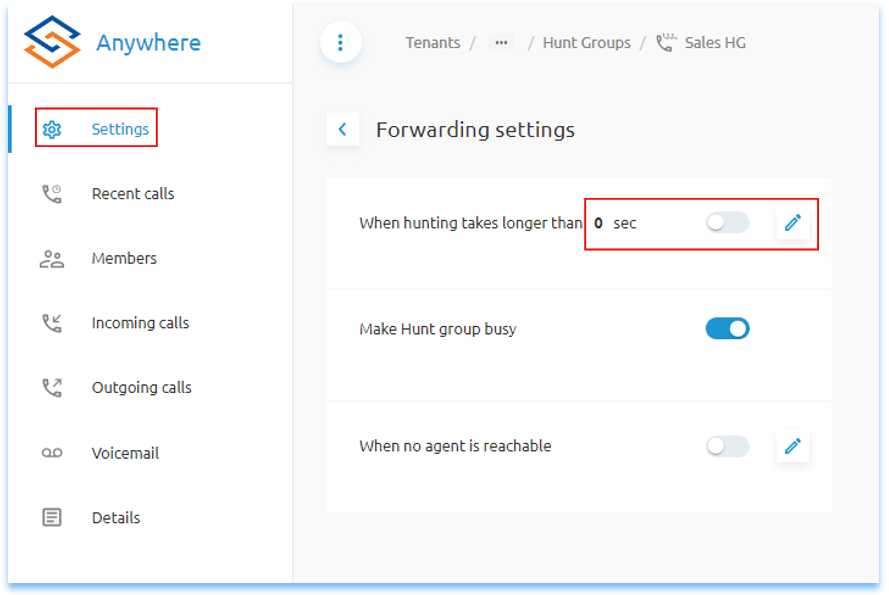
To change the huntgroup call policy, click on Settings then Hunting Mode.
- Regular - Incoming calls hunt through agents in the order they appear in the list, starting from the top each time.
- Circular - Incoming calls hunt through agents in the order they appear in the list, starting with the agent following the last agent to receive a call. When the search reaches the end of the list, it loops back to the top until it has tried all agents.
- Uniform - Incoming calls hunt through all agents in order, starting with the agent who has been idle the longest and finishing with the agent who most recently answered a call.
- Simultaneous - Incoming calls alert all of the agents at the same time. The first agent to answer handles the call.
- Weighted - Incoming calls are assigned to idle agents based on percentages one assigns in the Hunt Groups profile Weighted Call distribution page.
For hunting modes other than simultaneous, to bounce the call to the next agent after X rings, change the option for Hunt Group No Answer
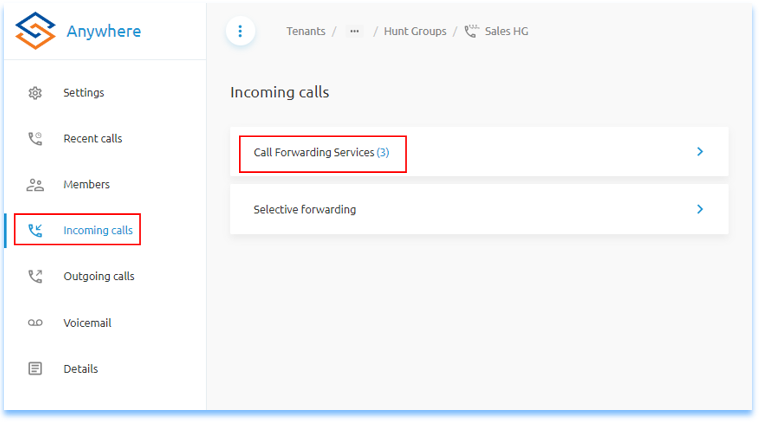
Hunt Group - Call Forwarding
For Incoming Calls, Call Forwarding Services can be set within the huntgroup. These include Always, Busy & No Answer. By default Always is disabled, Busy & No Answer are set to go to voicemail after X rings. These can also be disabled where required.
Note, these options are only available where the Voicemail Addons has been added under Details, Feature Options.
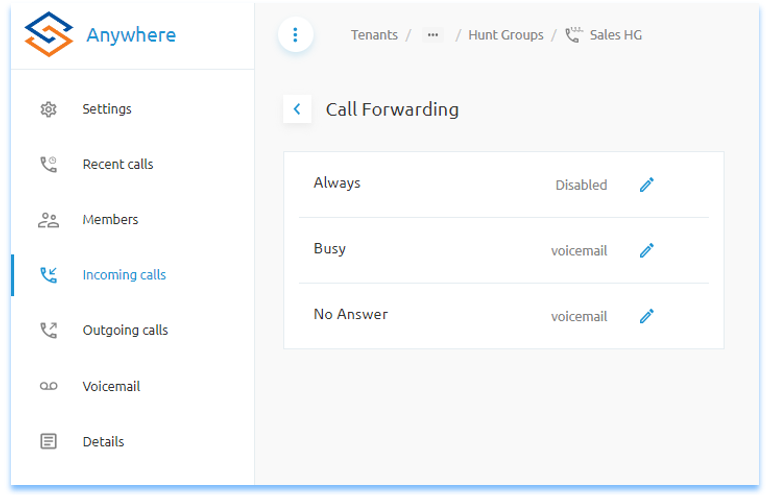
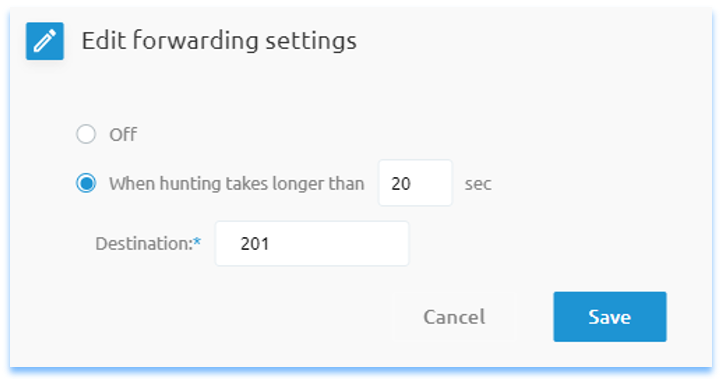
Always / No Answer
It is only possible to send the call to voicemail. To send calls to a different number, use the Forwarding Settings option within Settings. For calls hunting for 0 seconds the call will be forwarded immediately, if setting anything greater than 0 seconds then the call will ring the huntgroup for X seconds before being forwarded.
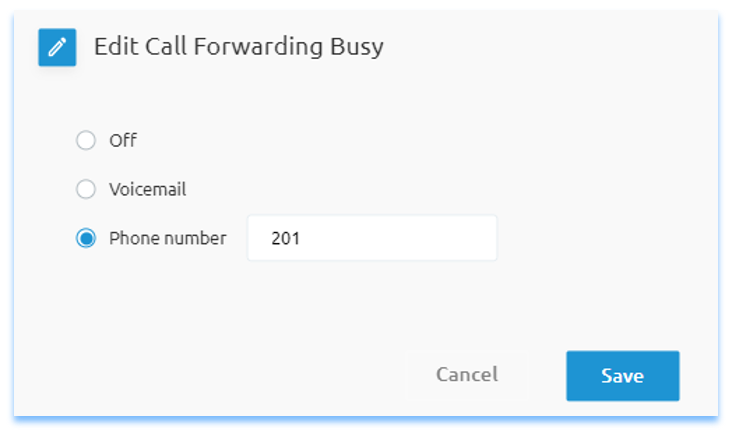
Busy
For busy calls, where Voicemail Addons has been set, calls will go to voicemail if the huntgroup is busy. However, adding the Call Forward Busy Pack in Details, Feature Options will allow and alternative number to be used.
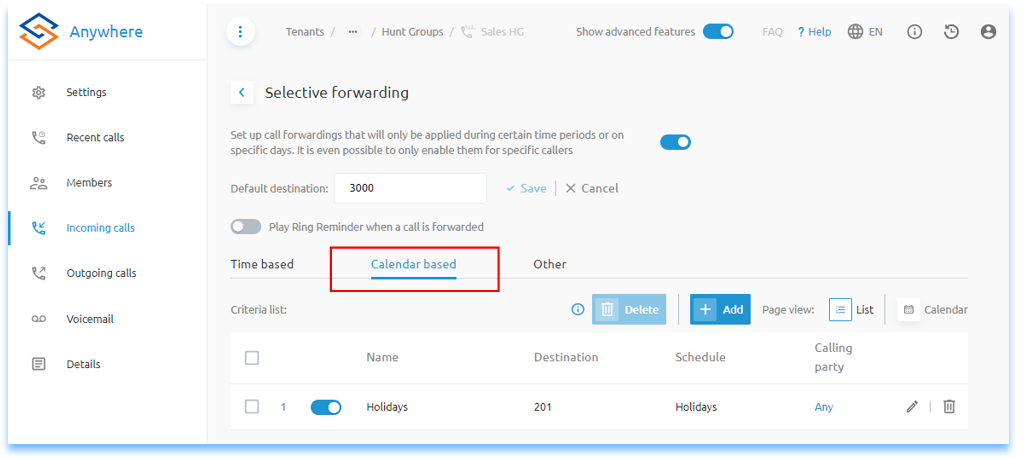
Selective Forwarding
Where calls are required to be forwarded based on time or date, then adding the Call Forwarding Selective Pack in Details, Feature Options will allow this feature.
Time or Date based schedules will need to be created in advance. See related articles 1.2.6 Schedules for more information on created schedules.
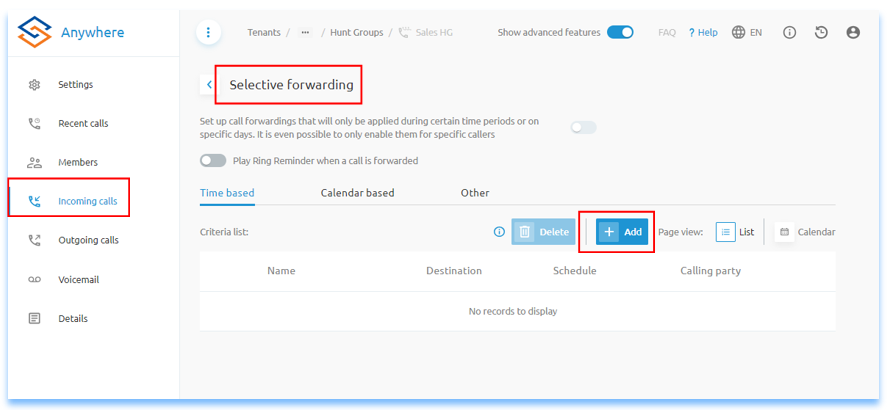
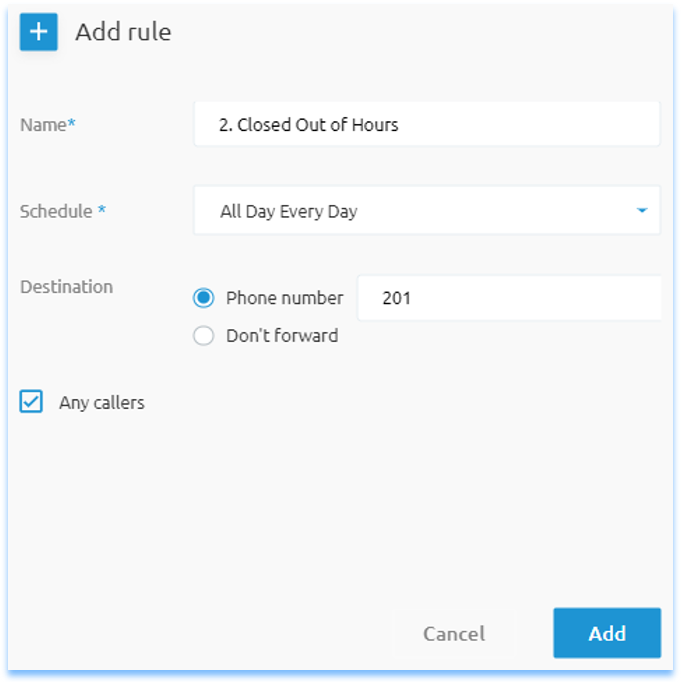
Click Add to create the first schedule. The first rule created will create the Default Destination number once saved. It is recommended that this first rule is capture all rule, for instance when the call flow is closed. Using a All Day Every Day schedule will ensure this rule is always used unless specified with a rule that overrides this rule.
Rules created in Selective Forwarding are action top down, the capture all rule should be the highest number putting the rule at the bottom of the list.
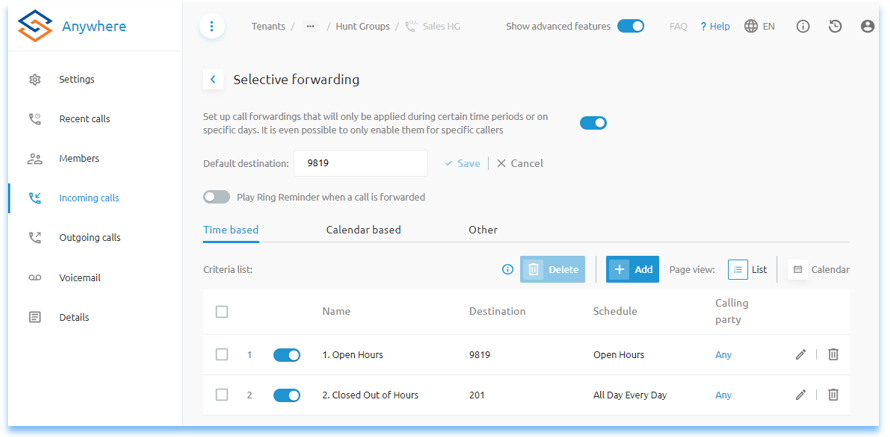
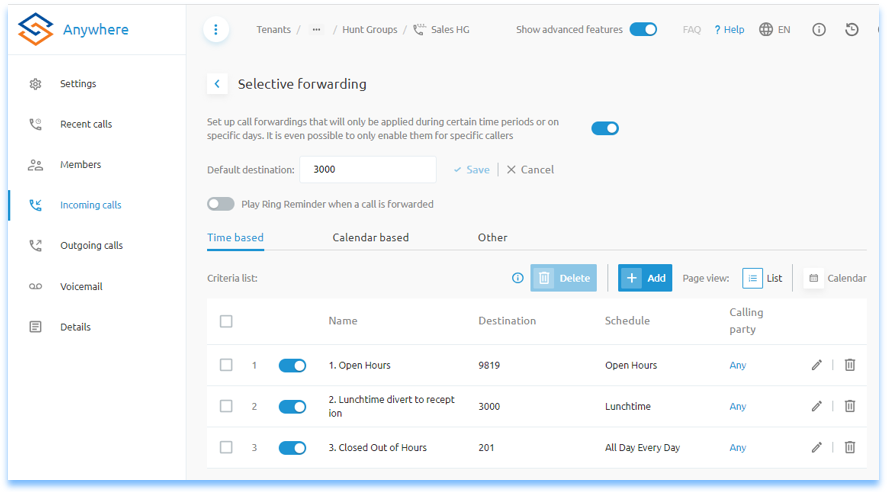
Multiple rules can be added and disabled as required using the toggle next to the rule where required. Selective Forwarding can also be disabled with the main toggle at the tope of the screen.
The below example an addition lunctime divert rule has been added sending the calls to reception during the Lunchtime schedule.
Note, it is recommended to send call to desitination based on the Phone Number option in the Add Rule wizard, setting to Default Destination could cause the rule to be sent incorrectly should the default rule change.
Calendar Based rules are added similarly where the Holiday schedule is created prior within Schedules in the group.
Alternative Numbers
The Alternative Numbers Pack needs to be added in Feature Options under Details.
Where a huntgroup has more than one DDI to call, the additional DDIs can be added to Alternative Numbers in Details, Phone Numbers. Click the plus symbol to add the additional numbers. Ensure the numbers added have also been activated, see related articles.
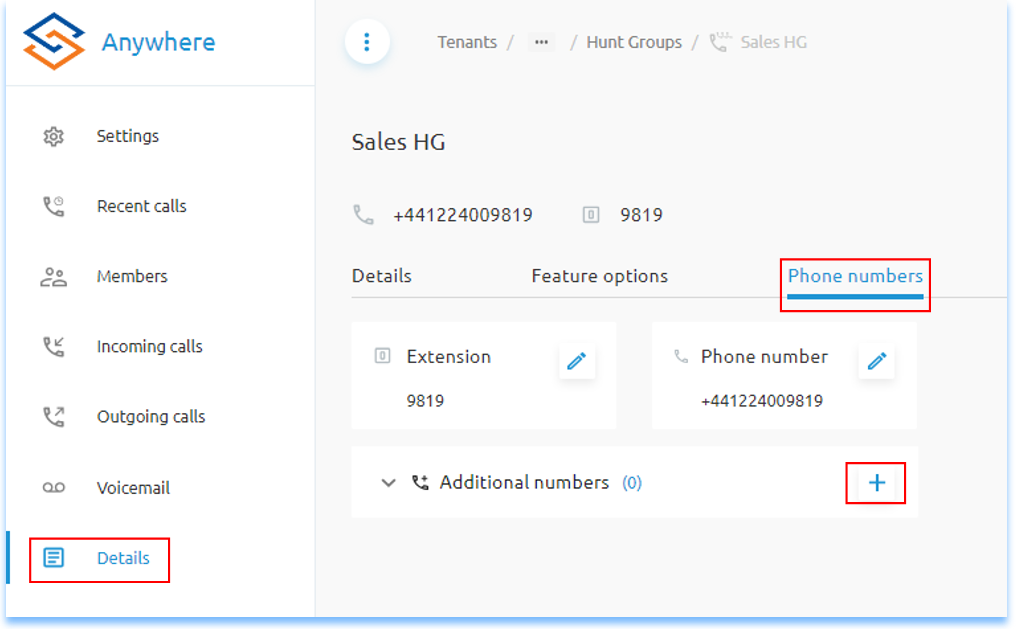
Pre Ported Numbers
Where a primary number is yet to be ported, this can be forwarded from the existing carrier to a temporary number. Add the temporary numbers against the huntgroup with Alternative Numbers. Calls to the primary number will forward to the Alternative Number until such time that the primary number is ported into your account.
Related Articles
Business Voice Features - Group Forwarding
Group Forwarding This guide is designed for administrators managing Vocalised services in the Anywhere Portal and need to manage call flow settings. ucSKILLS includes video tutorials covering the main call flow settings. Group Forwarding Redirect ...Business Voice - Call Pickup Groups
Call Pickup Groups This guide is designed for administrators managing Connect it services in the Anywhere Portal and need to manage call flow settings. ucSKILLS includes video tutorials covering the main call flow settings. Call Pickup Group Pickup ...Getting Started with Business Voice
Getting Started with Business Voice This guide is designed specifically for all users of Connect-it services. It will help you understand what you get with Business Voice. How to Get Started with Webex for Business Voice Download the Webex app for ...Accessing hunt group voicemail
In order to log in to a hunt group vmail you can either call the main voice portal number, enter the extension of the hunt group you will then be asked for the vmail pin for the hunt group vmail. You can also log into the hunt group vmail by pressing ...Business Voice IVR (Auto Attendant)
IVR (Auto Attendant) This guide is designed for administrators managing Connect it services in the Anywhere Portal and need to manage call flow settings. ucSKILLS includes video tutorials covering the main call flow settings. Add an IVR To add an IVR ...